What is an APEX Application?
An Oracle APEX application is a web-based interface built on top of database objects like tables, views, or procedures. Essentially, it consists of a series of interconnected pages that users navigate through menus, tabs, buttons, or hyperlinks. You can create an APEX application using the Create Application Wizard, which allows you to design pages and establish navigation declaratively, without the need for extensive coding.
APEX Pages
In Oracle APEX, a page is the fundamental unit of an application, with every application comprising one or more pages. To view how your application functions, you run or submit it to the Oracle APEX engine. This engine dynamically generates and processes pages based on the data stored in your database. New pages can be run individually or as part of the entire application.
Each page can hold buttons and fields called items that are grouped together into containers called regions. Pages may also include application logic, such as processes, and you can branch from one page to another using conditional navigation.
On an APEX page, you can execute various actions, such as performing computations (calculations) and implementing validations like edit checks to ensure data accuracy. Additionally, pages can be used to display dynamic elements such as reports, calendars, and charts. To design or update pages, the Page Designer serves as a robust tool, offering a user-friendly interface for customization and development. This integrated development environment provides a comprehensive interface for designing, configuring, and maintaining application pages.
Page Rendering and Page Processing
As discussed earlier, the Oracle APEX engine dynamically renders and processes pages using data stored in Oracle database tables. To view a rendered version of an APEX application, you send a request to the APEX engine through a URL.
When an APEX application runs, the engine performs two key processes:
1. Show Page (Page Rendering)
This process generates a viewable HTML page by assembling all the page attributes, such as regions, items, and buttons. Whenever you request a page via a URL, the APEX engine is executing the Show Page process.
2. Accept Page (Page Processing)
This process handles form submission, which includes executing computations, validations, processes, and navigation (branching). When you submit a page, the APEX engine runs the Accept Page process, saving the submitted data into the session cache and performing any necessary operations, such as computations, validations, or backend processes.
In Oracle APEX, conditions allow you to manage the visibility and behavior of your pages and their components, as well as control when processes, computations, and validations are triggered. A condition acts as a logical control mechanism, enabling you to specify when regions, items, buttons, and tabs should be displayed or hidden, and when certain processes, computations, or validations should be executed.
Application User Interface
In Oracle APEX, the Universal Theme serves as the default user interface, enabling developers to create modern web applications without needing in-depth knowledge of HTML, CSS, or JavaScript. With basic familiarity with APEX, you can leverage the Universal Theme to design responsive applications that are accessible, customizable, and easy to maintain.
The Universal Theme is engineered to be fully responsive, adapting seamlessly to different screen sizes, whether on smaller devices like smartphones and tablets, or larger screens such as laptops and desktops. It automatically adjusts its layout to the screen dimensions, ensuring that the user interface remains functional across various screen resolutions. Providing a comprehensive set of components and building blocks, the Universal Theme makes it simple to create any type of business application user interface. It also offers a high degree of customization, allowing you to control the look and feel of your applications, even without expertise in advanced UI design techniques or web development languages.
Session State Management
Session state in Oracle APEX allows developers to store and retrieve user-specific values as the user moves between different pages of an application. Since the Hypertext Transfer Protocol (HTTP), which is commonly used to deliver HTML pages, is stateless, each page request is treated as an independent event. This means that a web browser is only connected to the server for the duration of downloading a single page, and it does not retain any memory of previous or future page requests.
To preserve data across pages, such as form values entered by a user, session state must be used. Oracle APEX automatically manages session state behind the scenes, allowing developers to access session values from any page within the application. Each user is assigned a unique session ID during their visit, which is used to track and retrieve session data. The Oracle APEX engine identifies the user and session ID with each page request to fetch the appropriate session data from the database. The most visible location of the session ID is in the URL for a page request. The session ID displays as the third parameter in the URL.
Example:
https://apex.fakecompany.com/ords/demo/r/hr-app/update-employees?session=98765432101234
This example mirrors the structure of an Oracle APEX URL, with a base URL, workspace identifier (ords/demo), application alias (hr-app), page alias (update-employees), and the third parameter is a session ID (98765432101234).
A session in Oracle APEX is a logical construct that enables the persistence (or stateful behavior) of data across multiple page views. Each session is given a unique identifier, known as the session ID, which the Oracle APEX engine uses to store and retrieve the session's data (session state) before and after each page interaction.
Sessions are independent of each other, meaning multiple sessions can exist simultaneously in the database without interfering with one another. This allows for handling multiple users or interactions concurrently, each with its own set of data.
A user can run multiple instances of the same application simultaneously across different browser windows or tabs. However, APEX sessions are distinct from Oracle database sessions used to handle page requests. A user maintains a single APEX session throughout their interaction with the application, from sign-in to sign-out, which typically lasts for minutes or hours.
Each time a page is requested within an APEX session, the APEX engine either creates a new Oracle database session or reuses an existing one to access database resources. These database sessions often last only a fraction of a second, as they are opened and closed for each page request.
Application URL Syntax
Oracle APEX supports two types of URL syntax: Friendly URL syntax and f?p syntax. Applications created using APEX release 20.1 or later utilize Friendly URL syntax. Friendly URL syntax generates a URL structure that clearly identifies the Oracle APEX address, the application, and the specific page, using standard web parameter formatting.
Friendly URL syntax creates a URL with the following directory hierarchy and syntax: https://hostname:port/ords/r/path_prefix/app_alias/page_alias?parameters
Example:
https://examplehost:8080/ords/r/fakecompany/hr-app/update-employees?session=12345678901234
In this example:
- examplehost is the domain name of the server.
- 8080 is the port number assigned when configuring Oracle REST data services
- ords is the service name defined when configuring Oracle REST data services
- r is the router shortcut. This value is a constant and should never be changed.
- fakecompany is the Path Prefix which is a URL Path Prefix used to access RESTful services. When you create a workspace, this value defaults to workspace name.
- hr-app is the application alias. In a new application, the application alias defaults to the application name.
- update-employees is the page alias. In a new application, the page alias defaults to the page name.
- 12345678901234 is the session ID here.
In Oracle APEX, you can personalize the Friendly URL by modifying the Path Prefix, Application Alias, and Page Alias.
- The Path Prefix can be customized by adjusting the Path Prefix attribute in Workspace Administration.
- The Application Alias is configured within the application definition settings.
- The Page Alias is modified through the Page Designer.
These customizations help create cleaner, more intuitive URLs that enhance both the user experience and application management.
App Builder and the Create App Wizard
An APEX application is essentially a collection of interconnected pages, which are navigated using menus, tabs, buttons, or hyperlinks. These pages within the application share common session data and authentication settings.
To build an APEX application, developers use Wizards to declaratively create pages and define their navigation structure. Each page within the application is organized into containers called regions, which group related components together.
After the initial creation, you can modify your application by adjusting its attributes and adding new pages through the Create Page Wizard. The development process can be further managed by organizing pages into page groups, locking or unlocking pages for editing, adding comments for both developers and the application and accessing a range of utilities and reports for application, page, and cross-page management.
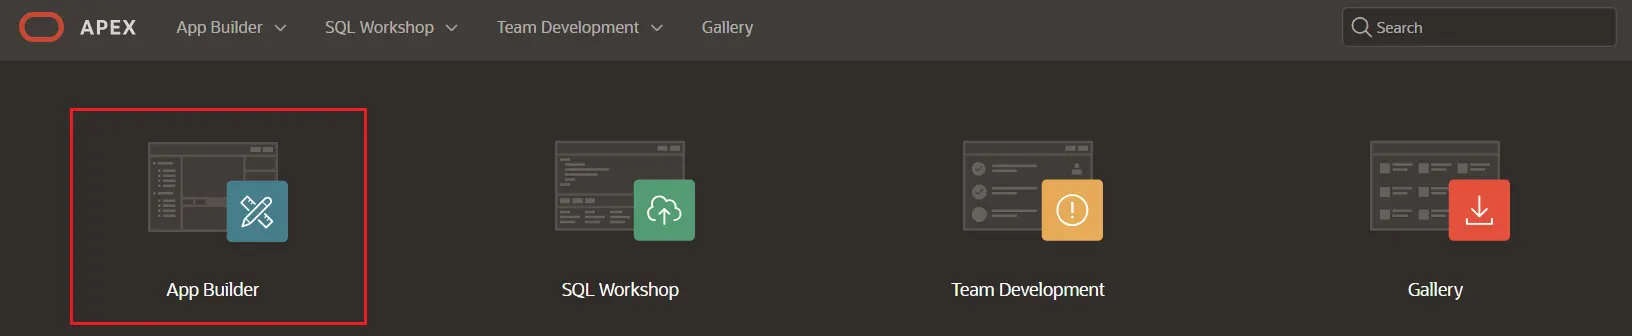
To create a new application in Oracle APEX, you begin by running the Create Application wizard in App Builder. After logging into your workspace and navigating to the workspace home page, you click on the App Builder icon. This takes you to the App Builder home page, where you can view all applications installed in your current Oracle APEX instance.
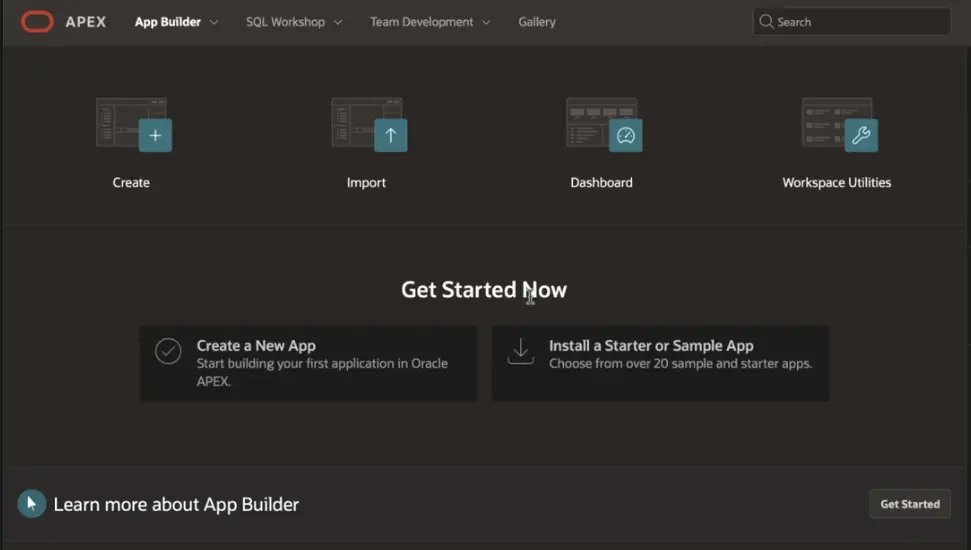
From the App Builder home page, you can:
- Create new applications by clicking Create.
- Select an existing application to edit.
- Import previously exported applications.
- View the Dashboard for a summary of your applications and performance metrics.
- Access Workspace Utilities for additional administrative tasks.
If you already have applications within the current APEX instance, they will all be listed on the App Builder home page, allowing easy access for editing, importing, or managing them.

To access a specific application's homepage in Oracle APEX, navigate to App Builder, then click on the name of the application you wish to work with. This will take you to the application’s homepage.
From the application homepage, you have several options to manage and customize the application:
- Run the application to view it in action.
- Create Page to add additional pages to the application.
- Export the application to save or share it.
- Copy the application to create a duplicate.
- Delete the application if you no longer need it.
- Click on Edit Application Definition to view and modify its definition.
When you log into your Oracle APEX workspace for the first time and navigate to App Builder, you will notice two options at the bottom of the App Builder page:
1. Create a New App
2. Install a Starter or Sample App
Click on Create a New App to open the Create Application Wizard, which guides you through the process of building a new application from scratch.
Alternatively, click on Install a Starter or Sample App to access the app gallery, where you can choose and install a pre-built Starter Application or Sample Application to get started quickly.
Once you create an application or install a Starter or Sample Application, these regions will no longer appear. To create a new application, you can click either Create a New App or click Create.
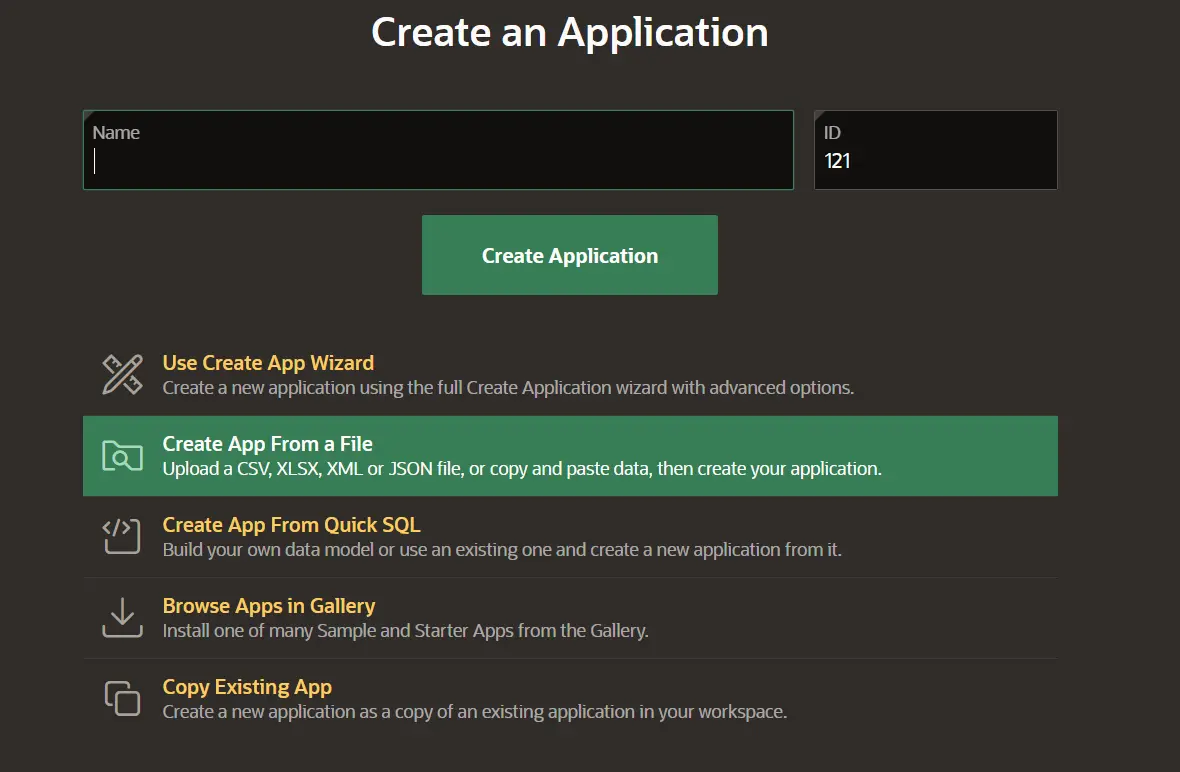
The Create Application Wizard in Oracle APEX allows you to build an application, whether you want to start with a blank page or create a complete application with multiple pages. On the Create Application page, you’ll find three main options:
1. New Application
Clicking New Application lets you create a fully functional application, either by selecting tables or providing valid SQL queries. You can add various types of pages, such as calendars, charts, dashboards, forms, interactive grids, master-detail relationships, editable grids, and reports. Additionally, you can configure application-level features.
2. From a File
The From a File option enables you to upload a file (CSV, XLSX, XML, or JSON) or copy and paste data to generate your application based on that file's contents.
3. Starter App
Clicking Starter App will take you to the gallery, where you can choose and install pre-built Starter or Sample Applications.
There are also other helpful options on the page:
Quick SQL: This tool allows you to generate the SQL needed to create a relational data model directly from an indented text document. Quick SQL is designed to streamline the process of creating SQL tables, triggers, and indexes, saving time and effort.
Copy Application: This option lets you create a duplicate of an existing application.
Creating an Application Based on Existing Tables
To create an application using existing database tables, follow these steps:
1. Log In and Navigate to App Builder
Log in to your Oracle APEX workspace, navigate to App Builder, and click Create.
2. Select New Application
Choose New Application, then enter a name for your application.
3. Choose an Application Icon
Select an icon to represent your application.
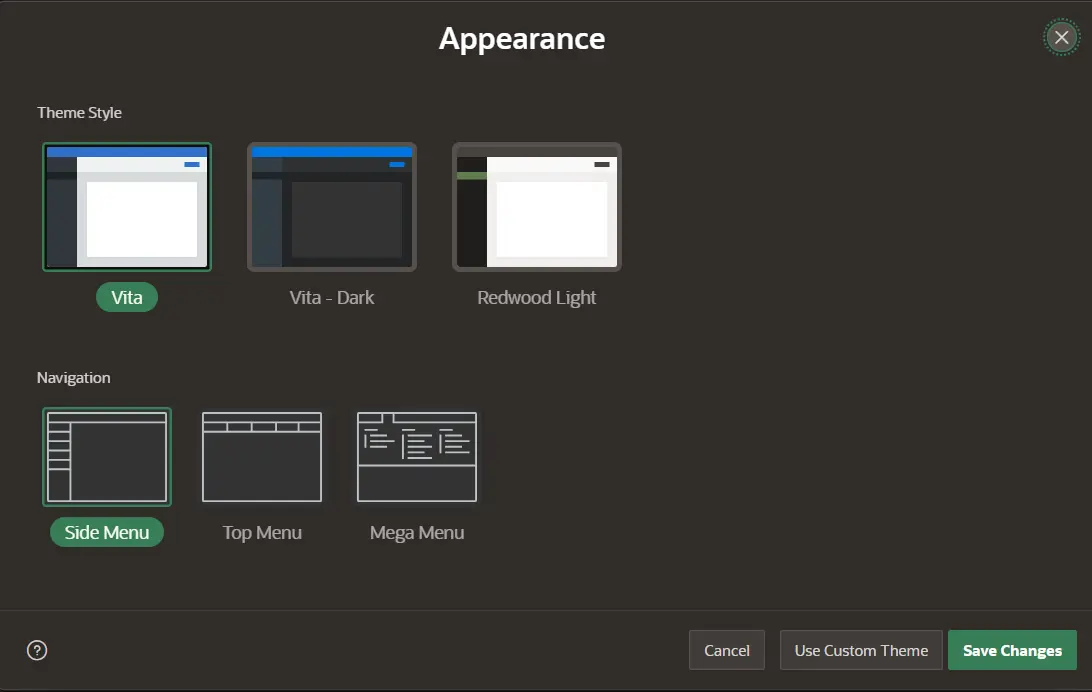
4. Set the Appearance
Click Set Appearance to customize the visual style of your application. You can either accept the default theme or choose from the available options, including:
- Vita
- Vita-Dark
- Redwood Light
5. Save Changes
After selecting your desired theme and appearance, save the changes to your application's appearance.
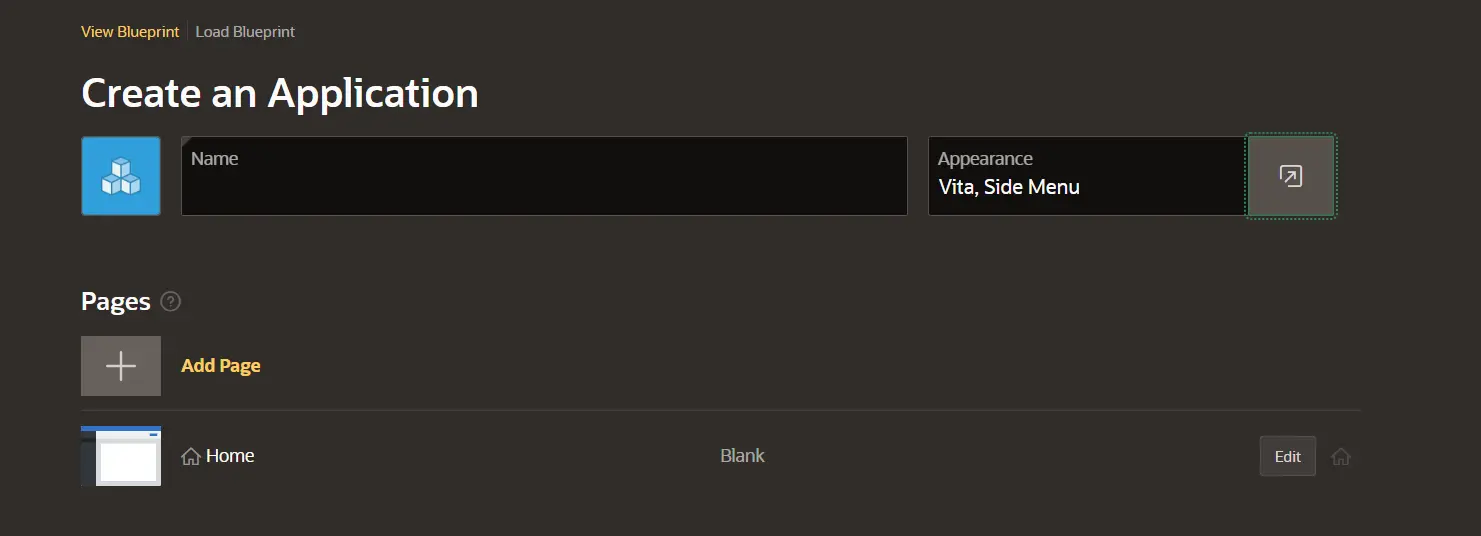
Once you’ve set your application’s appearance, proceed to add pages by clicking Add Page. Follow these steps:
1. Choose a Page Type
Select the desired page type and provide the necessary details. Repeat this process if you want to add multiple pages. Oracle APEX offers a variety of page types, including:
- Blank Page
- Calendar
- Cards
- Chart
- Dashboard
- Faceted Search
- Smart Filters
- Form
- Interactive Grid
- Interactive Report
- Map
- Master Detail
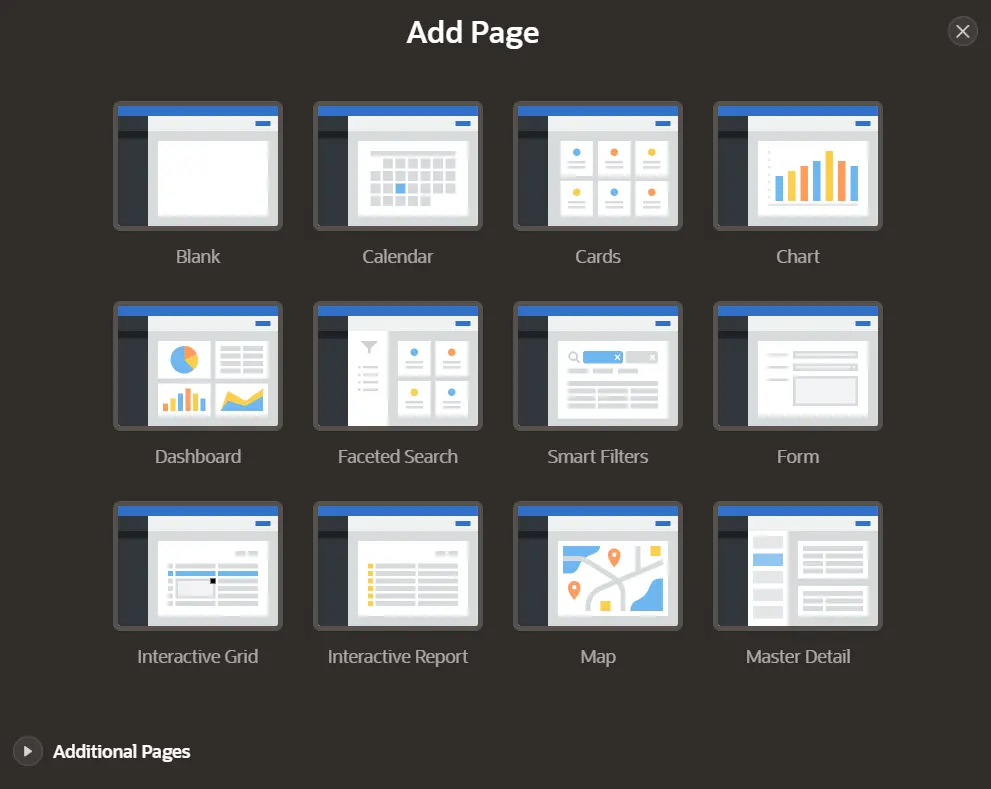
The user interface dynamically adjusts based on the selected page type, ensuring an optimized design process.
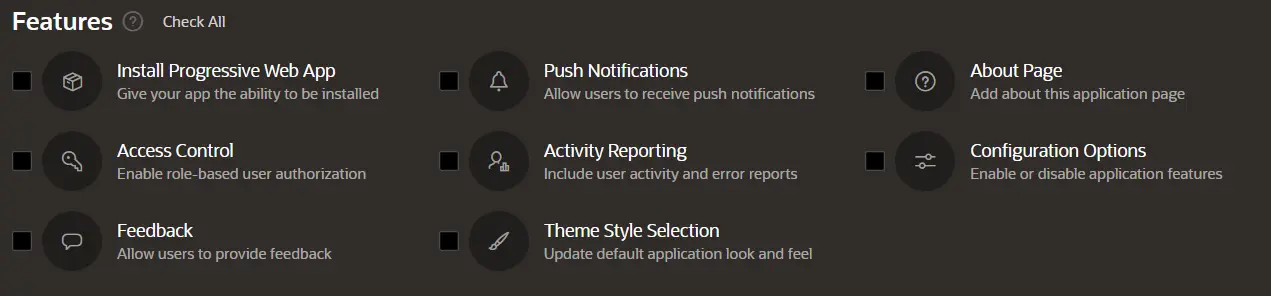
2. Select Application Features
Next, choose features to include in your application. Features provide application-level functionality and can only be added once per application. Some available features include:
- Install Progressive Web App: Enables your application to be installed as a web app.
- About Page: Adds a page to describe the application.
- Access Control: Implements user access management.
- Activity Reporting: Tracks application usage.
- Configuration Options: Allows you to define settings for application customization.
- Feedback: Provides users with a way to submit feedback.
- Theme Style Selection: Lets users choose a preferred theme style.
When you scroll down on the application creation page, you'll find the Settings section, which includes several important configurations:
1. Application ID
A unique numeric identifier for your application. By default, this field is populated with an automatically generated ID.
2. Schema
Defines the database schema associated with the application.
3. Authentication
Specifies the authentication method for securing access to your application.
4. Language
Determines the primary language of the application.
5. Advanced Settings
Provides additional configuration options for advanced users.
6. User Interface Defaults
Allows you to set default behaviors and styles for the application's user interface components.
These settings ensure that your application is uniquely identified, appropriately secured, and tailored to meet specific requirements.

After completing the configuration, review all the settings and click Create Application. Once the application is created, click Run Application. First, you must log in using your workspace username and password, then click Sign In. This will allow you to explore and test your newly created application.
Creating an Application from a File in Oracle APEX
Follow these steps to create an Oracle APEX application using data from a file:
1. Access the App Builder
- Navigate to your workspace home page and click App Builder.
- Click Create, then select From a File.
2. Choose Data Source
- The Load Data Wizard opens with the Upload a File tab selected.
- You can also choose the Copy and Paste option to manually paste column-delimited data.
- For file uploads, select a supported file format (e.g., CSV, XLSX, XML, TXT, or JSON).
- Alternatively, select a sample data set from the Select Sample list. Drag and drop a file or use Choose File to upload data from your computer.

3. Configure Data Loading
After uploading the file, APEX creates an underlying database table.
On the Load Data page, specify where to load the data:
New Table: Create a new table.
Existing Table: Append data to an existing table.Specify the Table Owner and enter a Table Name (note: table names default to uppercase).
Set Primary Key and Configure Columns
Choose the primary key type:
SYS_GUID
Identity ColumnClick Configure to select which columns to load. In the Configure dialog, review column names, data types, and preview the data.
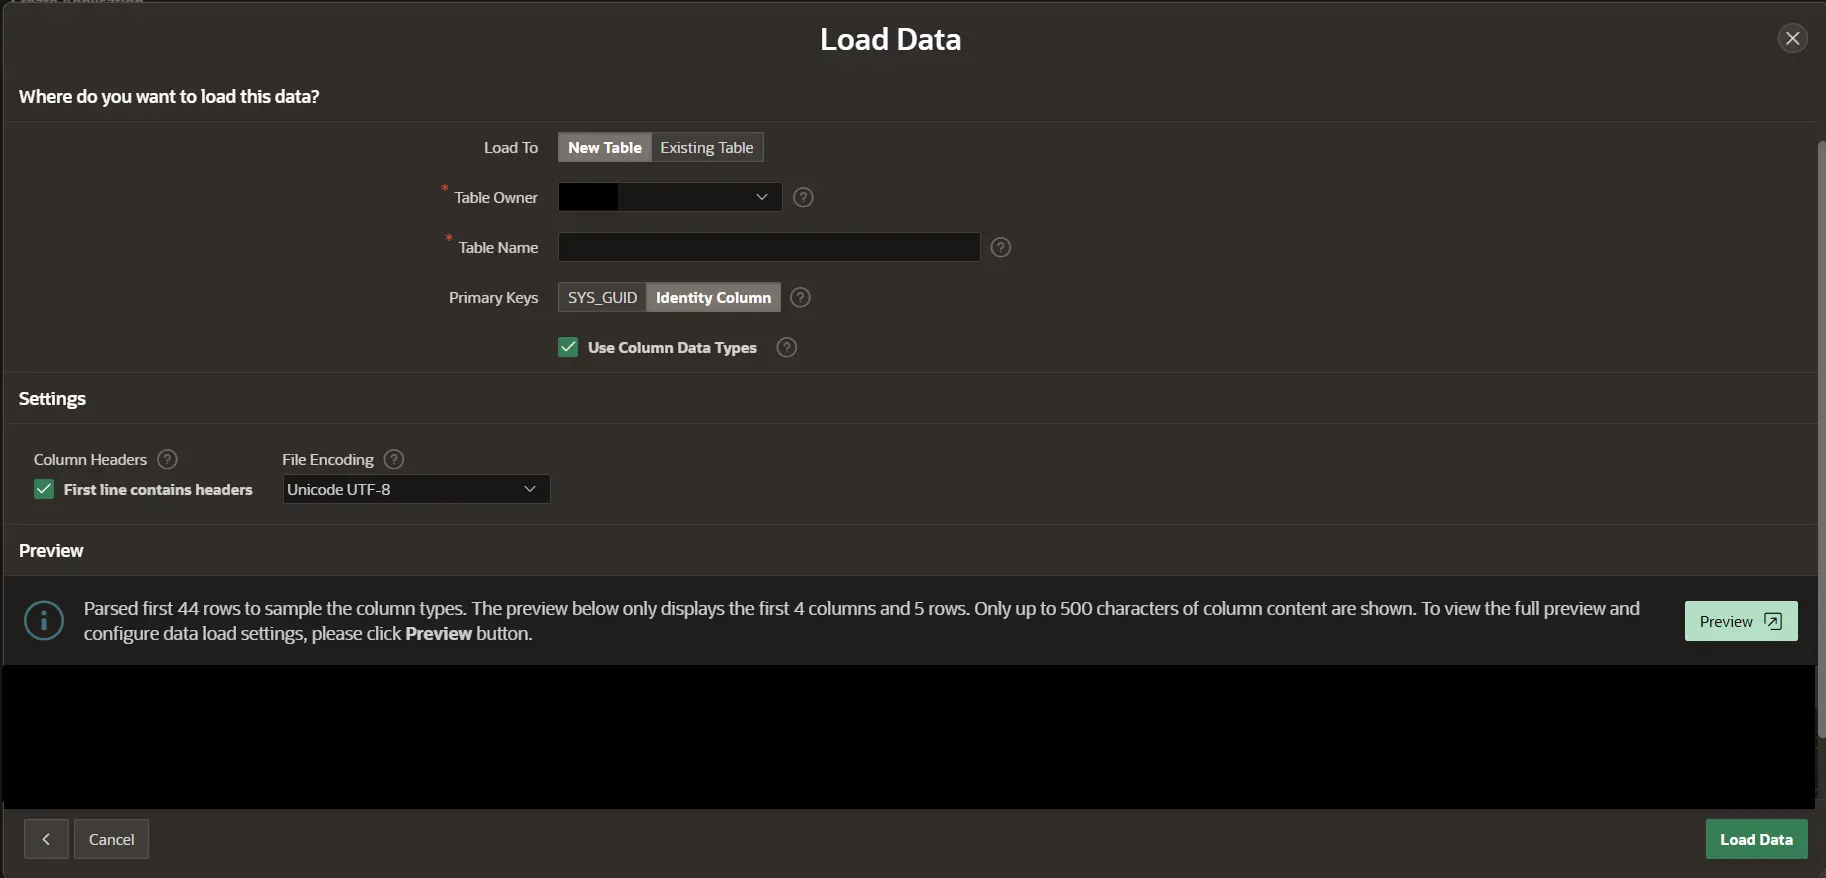
4. Adjust Additional Settings
- Check or uncheck First Line Contains Headers under Column Headers.
- Specify additional settings like Column Delimiter, Enclose By, and File Encoding.
5. Load Data
- After reviewing the settings, click Load Data.
- To view the table, click View Table in SQL Workshop, or proceed directly to create the application.
6. Create the Application
- Click Create Application to open the Create Application Wizard.
- Enter a name for the application and select its appearance.
- Scroll down to view the pages automatically added to the application.
- In the Features section, select desired features or click Check All to include all features.
7. Finalize and Run the Application
- Review all settings and click Create Application.
- Once the application is created, click Run Application.
- Log in using your workspace username and password, then click Sign In.
8. Explore the Application
- After signing in, the application’s home page is displayed, complete with a navigation menu on the left side.
Progressive Web Applications (PWA) in Oracle APEX
Progressive Web Applications (PWAs) are web-based applications designed to provide an experience that mimics native applications. They leverage modern web APIs to integrate closely with the device, offering features such as advanced caching, offline functionality, and device-specific installation. In Oracle APEX, you can define your applications as PWAs during creation or by modifying existing applications.
Key Features and Benefits of PWA in Oracle APEX
- Advanced Caching and Performance: Improved performance through optimized page loading and a new browser cache architecture for static files.
- Offline Capability: Provides a customizable offline page when the user is offline.
- Installability: Applications can be installed on devices via a dedicated "Install App" option.
- Customizable Experience: Service worker hooks enable deeper customization of PWA functionality.
Requirements for a PWA
1. Secure Environment: The application must be served over HTTPS or localhost. Unsecured environments will not support PWA features.
2. Friendly URLs: Ensure that the Friendly URLs attribute in the application definition is set to On.
3. Progressive Web App Settings: PWA functionality must be enabled under the application properties.
Steps to Create a Progressive Web Application
1. During Application Creation
Log in to your Oracle APEX workspace.
Navigate to App Builder and click Create.
Use the Create Application Wizard to create a new application:
- Enter the application name and define its appearance.
- Add pages and features.
- In the Features section, check Install Progressive Web App.
- Click Create Application.

2. Running the PWA
Once the application is created, click Run Application.
Log in with your workspace username and password.
On the application homepage, you’ll see an Install App button.
Click Install App and follow the prompts to install the application on your device.
Convert an Existing Application to a PWA
Open the application you want to convert in App Builder.
Edit the Application Definition:
- Under Properties, ensure that Friendly URL is enabled.
- Go to the Progressive Web App tab and enable Progressive Web Apps.
- Configure additional PWA attributes, such as offline page content and caching settings.
Sample Dataset and PWA Example
Go to SQL Workshop > Utilities > Sample Datasets in your workspace.
Install a sample dataset and create an application based on it using the Create Application Wizard.
Enable the Install Progressive Web App feature during the application creation process.
Run the application and observe the Install App button on the homepage.
Click the button to install the application and test its functionality.
Oracle APEX makes it straightforward to integrate PWA functionality into your applications, enhancing their usability and performance on both desktop and mobile devices.